Family: April 2013 Archives
Thursday I took the students in my Ancient Greek class at Augustine Christian Academy. We went to Philbrook to see a special exhibit of ancient artifacts -- statues, inscriptions, coins, jewelry, household items, and vessels having something to do with Aphrodite, the Greek goddess of love (known to the Romans as Venus), and her most famous child, Eros (aka Cupid).
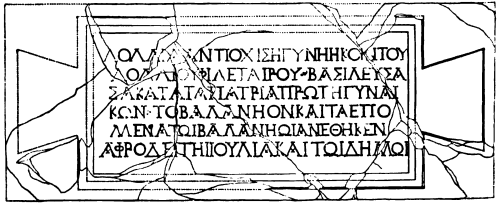
I had the students spend a good deal of time looking at a Greek inscription from the Roman period, from a public bath in the Greek town of Assos in Asia Minor. We're accustomed to seeing ancient texts set mainly in minuscule letters, with spaces between words and accent marks. It was interesting to try to decipher words in all caps with no spaces or accents, with part of the inscription missing and words sometimes wrapping around the end of a line.
Here is an image of the inscription, from Papers of the American School of Classical Studies at Athens: 1882-1883, published shortly after the inscription's discovery as part of the "first collection of Greek inscriptions ever made by an American expedition in classic lands."
Many artifacts depicted Aphrodite's role in the abduction of Helen and the disastrous war it sparked. Paris, prince of Troy, was asked to judge which of the goddesses Hera, Athena, and Aphrodite which one was the fairest. Aphrodite bribed Paris with Helen, the most beautiful woman in the world, who happened to be the wife of Menelaus, king of Sparta. Menelaus rallied the Greeks to get her back, the Trojans refused, and the Trojan War ensued, ending in the destruction of Troy. Aphrodite's mortal Trojan lover, Anchises, escaped the flames on the back of their son Aeneas, whose treacherous travels to the future site of Rome are told in Vergil's epic poem Aeneid. At least one coin in the collection depicts Aeneas giving Anchises a piggy-back ride.
I was fascinated by a vessel depicting the elopement of Helen and her return to Menelaus. There were names in tiny letters scratched into the pot above most of the characters. Some of them were written left-to-right and some right-to-left. There were phis and thetas, but there were Ls instead of lambdas, and they seemed to use X for the xi sound.
The exhibit has a roped-off "mature audiences only" section; we steered clear of it. There were a few items near the end of the exhibit (relating to drinking parties and a Greek practice that I'll euphemistically call "mentorship with depraved benefits") that should have been in the roped-off area.
After seeing the exhibit the students all decided to color a picture of an amphora (one student turned hers into an ιχθυς τανκ). We toured the gardens and marveled at a magnificent display of tulips on the south allee. On the rotunda's mezzannine, there's an exhibit of glamorous black-and-white photos of Hollywood stars of the 1930s, and next to it an intriguing display of art made from books.
We topped off the field trip with lunch, appropriately at Helen of Troy restaurant, 6670 S. Lewis Ave. We had gyros, tawook, stuffed grape leaves, hummus, falafel, and spanakopita. It was all delicious, and the students enjoyed trying new foods. The portions for the lunch sandwiches were larger than we expected.
It was a delightful day. If you have an interest in ancient Greece and archaeology, I'd encourage you to catch the Aphrodite exhibit; it's at Philbrook through May 26, 2013. And if you love the food of the eastern Mediterranean, I encourage you to dine at Helen of Troy.
Some tech notes so I don't forget how I did this.
Over this last weekend, my middle and youngest children were in a production of "The Music Man Jr.," a simplified, hour-long version of the Meredith Willson musical. (The cast, mainly elementary and middle-school aged children in the Classical Conversations homeschooling program, sang loudly and well, hit their cues, recovered gracefully from little slip-ups, and elicited genuine laughs again and again. It was good enough that I have actually enjoyed watching scenes again and again (even scenes without my kids) as I put together the DVD. Carletta Bradley and Jamie Lange of the Bradley Lange School of Fine Arts in Broken Arrow did a remarkable job of directing the students, who had fun while working hard.
I spent the last two performances taking video (for archival purposes, not for sale or public performance) with a borrowed Sony Handycam, which records video onto mini-DVDs. Each mini-DVD holds about 55 minutes in long-play mode, and between the two performances I wound up with four discs and a bit over 3 GB of video.
I thought it ought to be a simple matter to combine the resulting video object files (VOBs) on the mini-DVDs into a single DVD, and to do it without decompressing and recompressing the video and audio streams. I tried DVD-Shrink, which was good for identifying chapter points, and you can set it not to compress the video, but in the end I couldn't get a DVD built.
So here's what I did instead:
Copied all the contents of each mini-DVD onto my hard drive, each DVD with its own folder.
Used DGIndex (dgmpgdec158.zip), and added each VOB file (there were six in all) to a single project, then "save project and demux video," creating two files, an .M2V MPEG-2 video file and a .AC3 audio file.
Used Adobe Encore CS3 to attach the demuxed video and audio to a timeline, and then find the time to use (hour, minute, second, frame) for each chapter break. Encore was unable to create the DVD files, pulling an error each time, complaining about a problem near the end of the combined video. Evidently this is a known problem, but one without a solution. So in the end, Encore was only useful for identifying chapter points.
Used DVDAuthorGUI 1.029 to set the chapter points determined in Encore, to create M2V stills from 720x480 JPG images (created with GIMP), one for each menu, to attach buttons and actions to the menu and link them together. Click the link for how to make menus with DVDAuthorGUI.
Authored the DVD with DVDAuthorGUI, which created a folder with the normal DVD subfolders (VIDEO_TS, AUDIO_TS), VOBs, and IFO files.
Added another folder to contain non-DVD info -- a couple of audio recordings of the performances that don't have the sounds of me operating the zoom and swiveling the camera.
Final step: Write the folder out to DVD as a data DVD and be sure to close the disc to make the DVD player happy.
Now that I've successfully built a disc, I could try to make a more complicated menu, complete with embedded video and audio. It would be nice to be able to upgrade the menus without redoing the VOBs.
MORE:
videohelp.com is a comprehensive, crowdsourced resource on recording, editing, and playing back video in various tape and optical formats. One nice feature: Reviews of playback devices that allow you to do an apples-to-apples comparison of capabilities, e.g., which video and audio formats can the player handle.
UPDATE 2014/04/10:
So I'm doing this again and re-learning some lessons. Here's more step-by-step, with some changes. (No Adobe anything this time.) I will add more notes later when I have time.
1. Copy all the contents of each mini-disc into its own separate folder on your computer's harddrive.
2. Launch DVDAuthorGUI, then from the tools menu, launch DGIndex.
3. In DGIndex, File | Open, then navigate to the folders where you copied the mini-disc contents, and add the VOB files from each of the folders to your project. Make sure the order is right. Click OK when done.
4. File | Save Project and Demux Video. I use a separate working directory named with the event's initials, date YYYYMMYY and time -- it just needs to be a unique name. Demuxing takes about 6 minutes. Exit DGIndex.
5. Use ReStream to remove ending sequence on your m2v file, which, if not done, will mess up DVDAuthorGUI.
6. Launch DVD-Shrink, and use it to find where you want chapter points. Go to Reauthor, then use the DVD browser to navigate to where you copied the minidiscs to your hard drive. You'll drag each disc's contents as a separate Title over to the DVD structure pane on the left. The icon with two arrows lets you set a precise start time, which helps you find exactly where you want the chapter break, down to the 1/2 second.
The chapter points are per original minidisc, so for the video in minidisc 2 and following, you'll have to add the running time of the previous disc or discs. (Excel is good at adding times, if you don't want to do Base 60 arithmetic in your head.) It's helpful to put these times in a text file, which you can then copy and paste into DVDAuthorGUI. Keep in mind that DVD-Shrink uses hour:minute:second:frame format, but DVDAuthorGUI expects hour:minute:second.decimal format. So if DVD-Shrink says the starting point is frame :15, substitute .50 (half of 30 frames).
(Further NOTE: DVDAuthorGUI thinks it can help you define chapter points interactively, but its visual editor uses the Windows Media Player, which is sloppy and imprecise. So use DVD-Shrink to find exactly where you want your chapter points.)
7. Launch GIMP to create your title image. You might use a favorite photo from dress rehearsal, and add title and chapter names as layers above it. Save it as a high quality JPG. (DVDAuthorGUI accepts BMP files, but then converts to low-quality jpg, so save it yourself as a high quality jpg.)***
8. Back to DVD Author GUI. Add Title and then navigate to the .demuxed.m2v file you created with DGIndex. Select the file. Then, on the next dialog, select the audio file.
9. In DVDAuthorGUI, click chapters, then copy and paste the list of chapter times from your text file to the dialog box and click OK.
10. In DVDAuthorGUI, click the Menus menu (on the menu bar), then Create M2V Still. Navigate to the JPG file you created in step 7, then tell it where to save the result. For aspect ratio, choose 4x3 or 16x9, whichever matches the ratio of your video.***
11. In DVDAuthorGUI, click the Menus button, then, on the Menu Manager popup, you have two choices, creating a new menu or importing an already-defined menu. Choice A: Click the Add New Menu button. On the file chooser, pick the .m2v still you created in step 10. Add an audio stream if you want it, or cancel if you don't. Choice B: Click the File menu and then "Import menu from file." This allows you to export a menu from another project as a .dvam (DVDAuthorGui project file), edit it offline, and load it in. If you already have a menu you like to use as a basis for this project, Choice B can be quicker than Choice A.
12. Now you're in the menu editor. I like to check the advanced box, because then I can specify pixel position and width and height of each clickable area. I keep it simple -- outlined box around each chapter title, linked to jump to that chapter. Once you're happy, click accept.
13. Click the nav cmds icon, and change the post-command for the title to "call menu", so it will automatically go back to the menu when it's done playing. Set first play to jump titleset 1 menu. Click accept.
14. Add any extras you'd like to add. I haven't tried this yet.
15. You're ready to author the DVD. Click the "author DVD" icon. When it asks for a folder name to create the DVD, you need to navigate to where you want the VOB files to go and then give the name of a folder that doesn't yet exist. Click Save and it will start going. Authoring took about 7 minutes to complete.
16. The folder where you put the VOB files is ready to write to a DVD using your favorite DVD burning utility. You might want to add in photos, audio, a scan of the program.
*** NOTE: Using a high-quality JPEG didn't produce a high-quality image for the menu after all. There is a method to turn a still image into an M2V file for a menu using DVD Shrink. I haven't tried it yet. More info here, here, here.